How to integrate
If you haven't already signed up for Zonos, complete our contact sales form to get started. A dedicated onboarding representative will contact you within 24 hours to guide you through the integration process once your account agreement is in place.
Seamlessly integrate Checkout with your Salesforce Commerce Cloud store by following these steps:
Create metadata archive
Before installing the cartridge, make sure that you have a working sandbox with a site based on SFRA installed. Then create a site import metadata archive:
- In your extracted Zonos LINK cartridge, rename the
/link_zonos/metadata/sites/RefArchfolder to the ID of your SFCC site. For instance, if your site ID is "GlobalEcom," rename so you have/link_zonos/metadata/sites/GlobalEcomin your folder structure. - Create a Zip archive of your
/link_zonos/metadatafolder, and name the zip archive asmetadata.zip. Note: Include the/metadatafolder itself in the zip archive.
Import metadata archive
Once metadata.zip is prepared, import it into your SFCC sandbox:
- Go to Business Manager > Administration > Site Development > Site Import & Export.
- Upload
metadata.zipusing the Local upload option. - After uploading, locate the archive in the list and click Import.
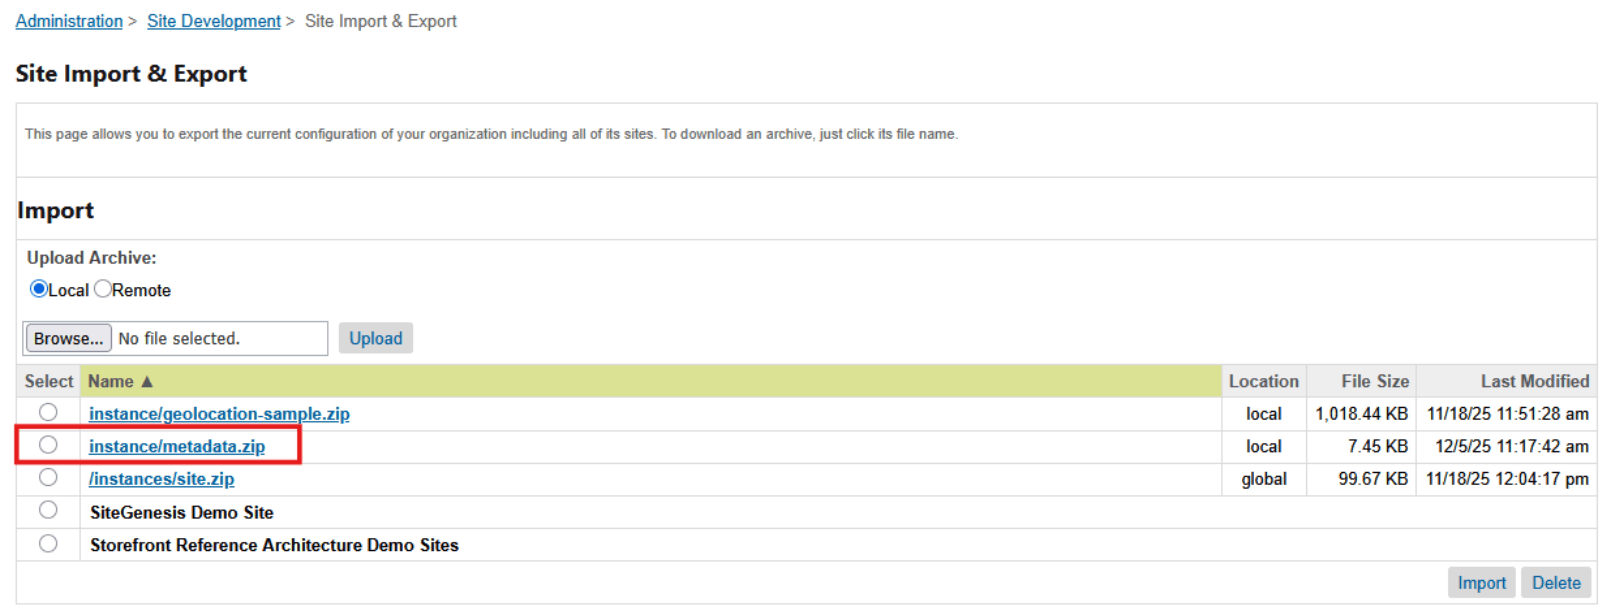
This step creates required site preferences, services, credentials, and custom objects used by the Zonos integration.
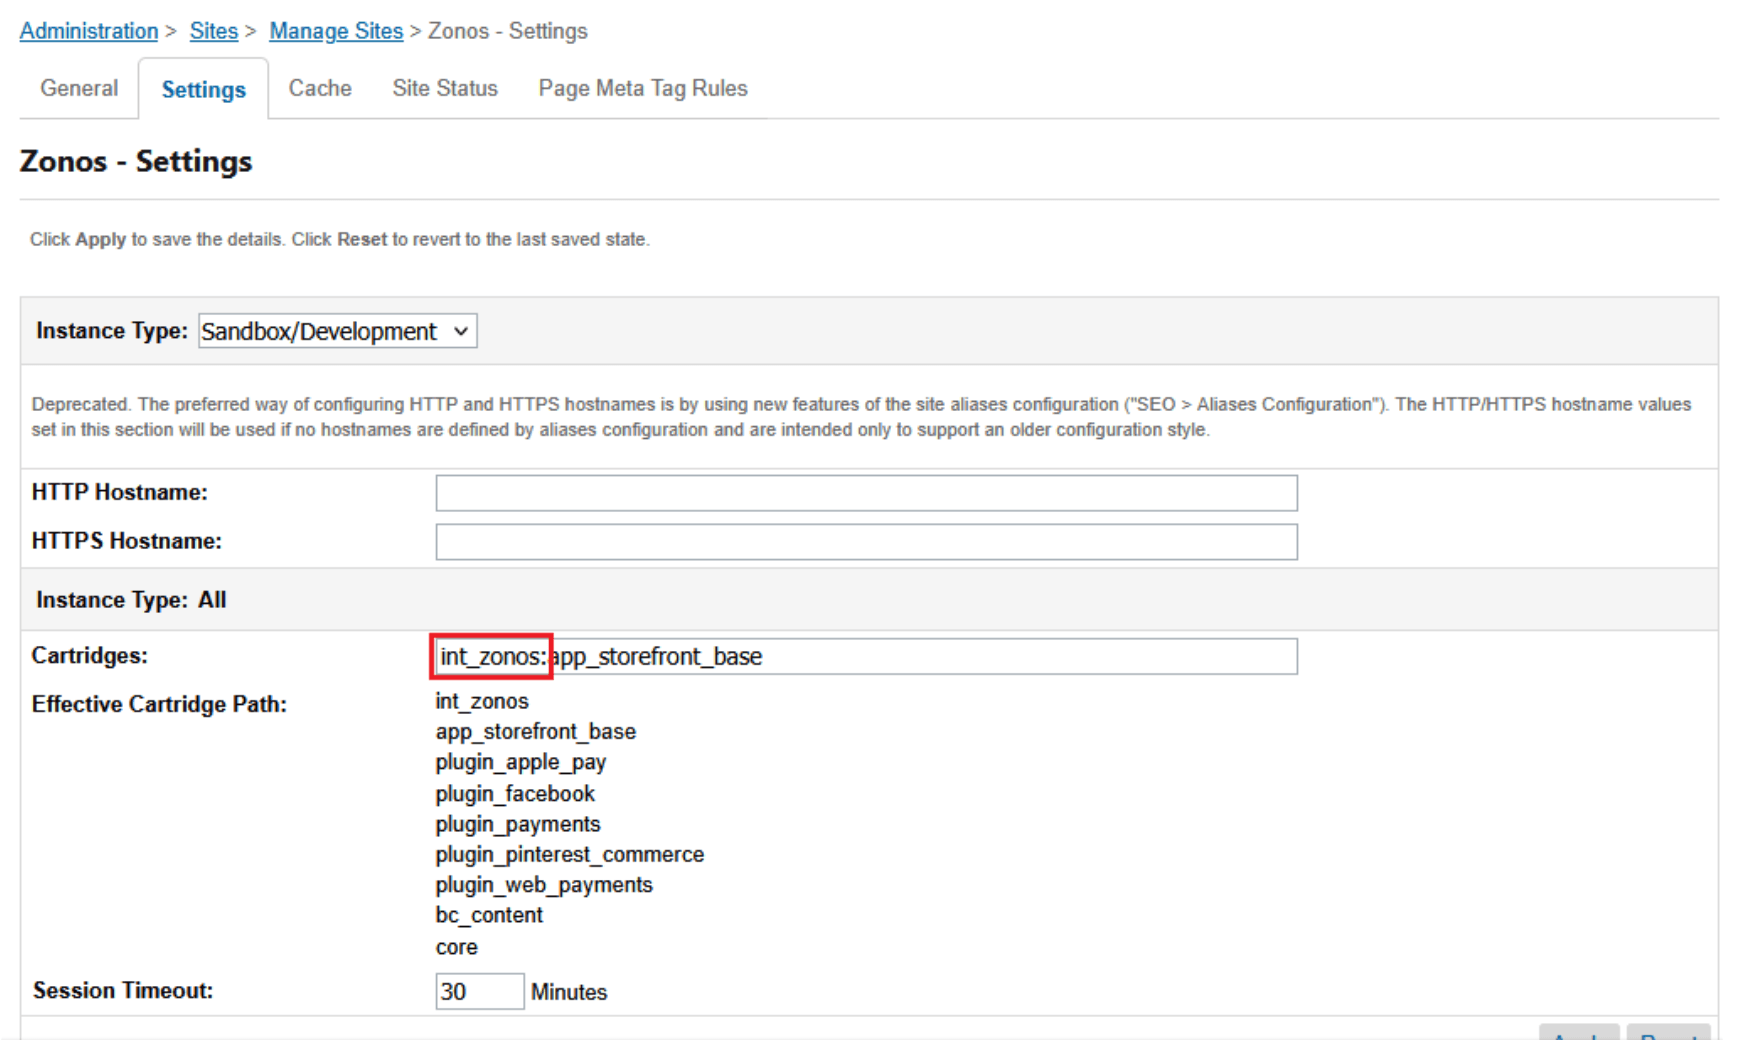
Add cartridge to cartridge path
Add the int_zonos cartridge to your site's cartridge path to activate its controllers, scripts, and templates:
- Navigate to Administration > Sites > Manage Sites > [Your Target Site] > Settings.
- Insert
int_zonosinto the cartridge path before the base SFRA storefront cartridge (app_storefront_base).
Configure pipeline aliases
There are 2 custom Pipelines included with the cartridge that should have pipeline aliases added within Business Manager:
Zonos-OrderConfirmation
This is used for the custom order confirmation within SFCC once the order is completed within the Zonos checkout. The user will be redirected here. For example, the alias could be zonos-order-confirmation. Please select and add an appropriate alias for your business that is different from the alias you use for the native SFCC/SFRA checkout order confirmation page (COSummary-Submit).
Zonos-PlaceSFCCOrder
This is used for the custom endpoint used to create the Zonos order within SFCC/SFRA and it is assumed that the alias is zonos-placesfccorder. If you use a different alias here, you will need to note this when you get to service set-up. This is not a public facing url, so using zonos-placesfccorder is recommended for initial set-up to maintain ease of using this cartridge.
To configure these two Aliases, in Business Manager, navigate to Merchant Tools > URL Rules > Pipeline URLs.

Configure SFCC services
With the site import in step 2, two SFCC services (with accompanying profiles and credentials) were created: zonos.api.graphql and create.order.api.sfra.
Single site setup
If your organization has a single storefront site within your SFCC organization, there is nothing additional to do here, and you can continue to the next step.
Multiple sites setup
If your organization has multiple storefront sites, or plans to have multiple storefront sites, within your SFCC organization, you'll need to make updates/additions to your SFCC services. When you have multiple SFCC sites that will utilize the Zonos integration, you will need a create order API service for each site. For each site, do the following:
- Create a new credential with the name
create.order.api.[siteID]. - Assign the credential URL to be:
https://[Sandbox Host]/s/[Site ID]/Zonos-PlaceSFCCOrder(for example:https://wxyz-001.dx.commercecloud.salesforce.com/s/RefArch/zonos-placesfccorder). - Create a new service with the name
create.order.api.[siteID]and assign to it thecreate.order.apiprofile, and thecreate.order.api.[siteID]credential you created in step 1.
Once complete, you should have a create order API service for each of your sites.
Note: If you didn't rename the original
create.order.api.sfraservice to be the create order service for one of your sites, and it still exists, you can delete it. Leave thezonos.api.graphqlservice name as it is. Even with multiple sites, you'll only need a single Zonos API service.
Configure Zonos custom site preferences
In Business Manager, navigate to Merchant Tools > Site Preferences > Custom Preferences, then click on the zonos preferences group to access the Zonos custom site preferences.
Set the following site preferences for your site(s):
| Preference Name↕ | Description↕ |
|---|---|
| Zonos Enabled | Feature switch used to enable/disable the Zonos integration on the storefront. If not set, default value (No) is used. |
| Main Zonos Script | (Required) URL of client (browser) side script for Zonos integration. Supplied by Zonos. If not set, default value (https://cdn.jsdelivr.net/npm/@zonos/elements/dist/scripts/loadZonos.js) is used. |
| Blur OnInit Script | (Optional) URL of client (browser) side script for blurring initial price values when automatic currency conversion is turned on. Supplied by Zonos. |
| Public API Token | (Required) Public integration token. This value can be found in your Zonos Dashboard (Settings > Integrations > API Keys: Public Credential). |
| Private API Token | (Required) Private integration token. This value can be found in your Zonos Dashboard (Settings > Integrations > API Keys: Zonos API). |
| Zonos Store ID | (Required) Store ID provided by Zonos. This value can be found in your Zonos Dashboard (Settings > Integrations > App credentials: Store ID). |
| Currency Element Selector | (Optional) jQuery-style selector string (without quotes) for price values to which Zonos should apply currency conversion. |
| Place Order (Checkout) Button Selector | (Optional) jQuery-style selector string (without quotes) for buttons that should initiate the Zonos modal checkout. |
| Zonos Payment Method ID | SFCC Payment method ID used when creating the Zonos order within SFCC. Included within the data import is a new Payment Method and Payment Processor, both with id ZONOS. This new payment method id is also the default value for this custom site preference. If you prefer to have a different payment method associated with Zonos orders, the value here can be changed to the ID of any valid Payment Method configured within Business manager. |
| Zonos Ship Method Mapping | JSON mapping of shipping method IDs from Zonos order details response to SFCC shipping method IDs when placing Zonos orders into SFCC. Set a default mapping so if not explicitly mapped, unmapped Zonos shipping methods map to a default SFCC ship method. See the "Configure shipping methods" section below for a more detailed explanation. |
| Place Order Password | (Required) This value is used by SFCC to ensure that order creation API requests are from a trusted, internal (i.e. SFCC job) source. This value can be any character string (of upper/lower-case letters, numbers, and standard special characters) you like. Example: X$7eo$33B!z= |
| SFCC Storefront Password | Storefront password for the SFCC site (if protected). |
| Place Order Service Name | (Required) The name of the create order API service you configured in step 5. Note: This name must exactly match the service name. |
| Origin Shipping Address | Origin Address for shipping warehouse, sent to Zonos, JSON format. Example: {"administrativeArea": "Pennsylvania", "administrativeAreaCode": "PA", "countryCode": "US", "line1": "975 S Tech Ridge Dr", "line2": "", "locality": "Harrisburg", "postalCode": "17025"} |
| Zonos Default HS Code | (Required) Zonos Default HS Code used if the product value is null. If blank, default value (6109.10) is used. |
Configure shipping methods
During Zonos Modal Checkout, shoppers select shipping methods defined in your Zonos Dashboard. When these orders are imported into SFCC, their shipping methods must correspond to a valid SFCC shipping method. To support this:
- Set up one or more shipping methods in SFCC to which your shipping methods in Zonos should be mapped.
- In the Zonos Ship Method Mapping custom site preference described above, establish one or more shipping method mapping(s) between your Zonos shipping method(s) and your SFCC shipping method(s).
Ship Method Mapping
In the form of a JSON object, the ship method mapping maps your Zonos shipping method(s) to your SFCC shipping method(s). This mapping must have a mapping record for every potential Zonos shipping method (service level) that could be selected in your Zonos checkout. It is highly recommended that you also include a default mapping record that will be used in cases where a Zonos order is placed with a shipping method for which a mapping to a SFCC shipping method doesn't exist, thus preventing downstream failures caused by a lack of shipping method in the SFCC order.
The format for the JSON object is:
{
  "[Zonos Shipping Service Level Code]": "[SFCC Shipping Method ID]",
  ...
  "default": "[Default SFCC Shipping Method ID]"
}
Example
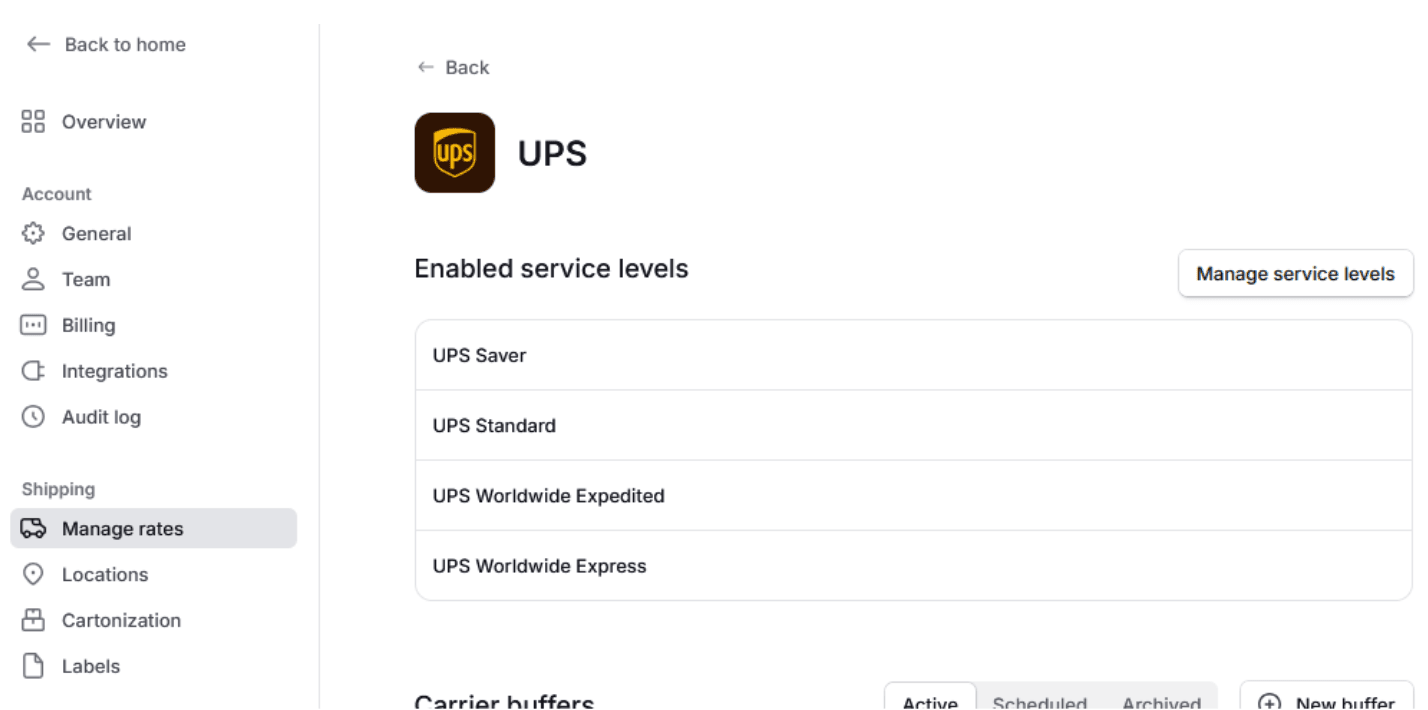
Assume you have enabled the following service levels in your Zonos Dashboard:
For whatever your reason (ie. backoffice requirements, an additional third-party shipping service integration, etc.), you might be limited to the following shipping methods in SFCC for your site:
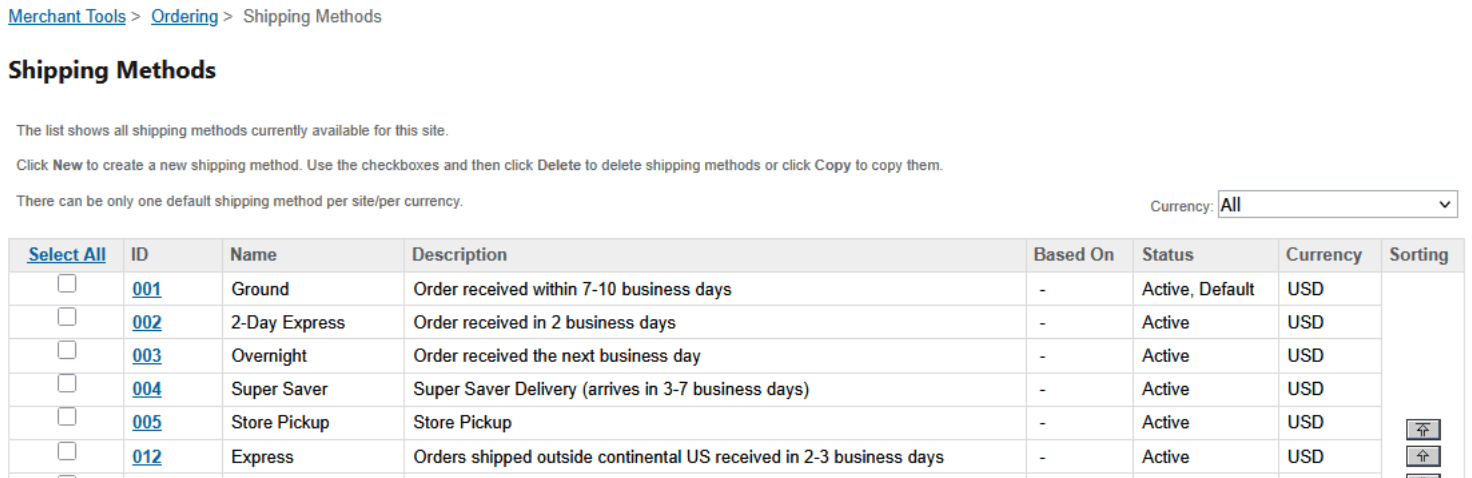
When a new Zonos order is received and then placed into SFCC, the shipping method must be from this list.
To build your mapping, log into your Zonos Dashboard, go to Shipping > Manage Rates, and then click into each of the displayed Enabled service levels, where you'll see a display similar to the following:
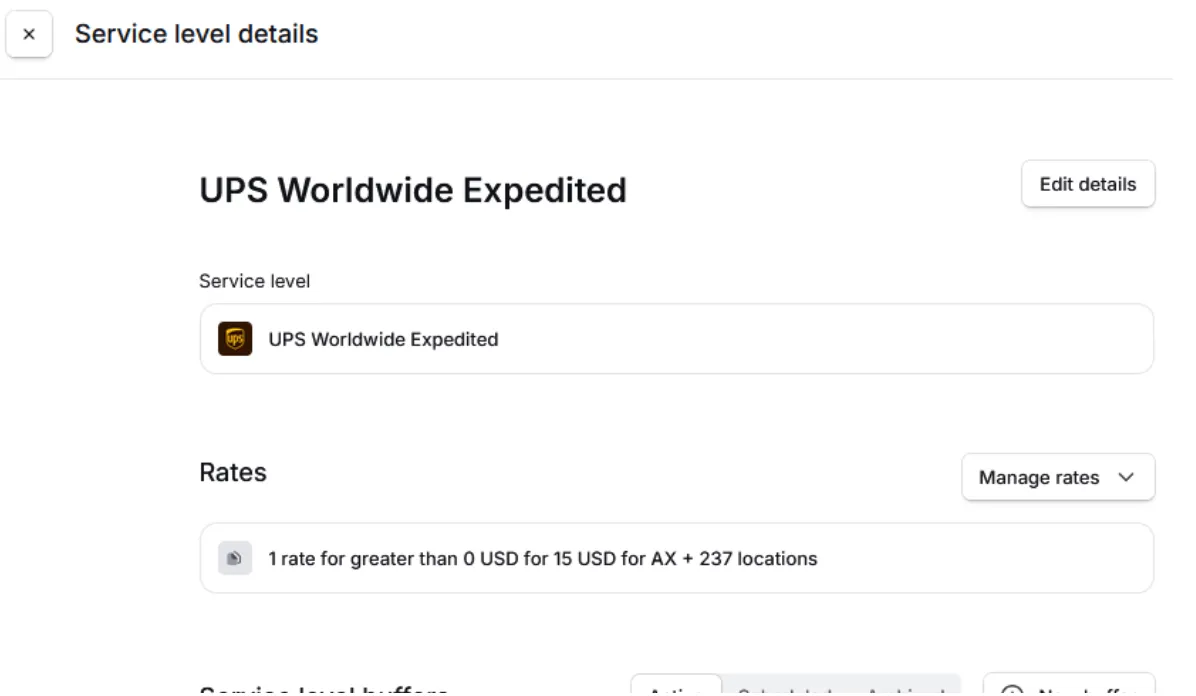
In each, click on Edit details to get (or set) the Zonos shipping service level code (see below).
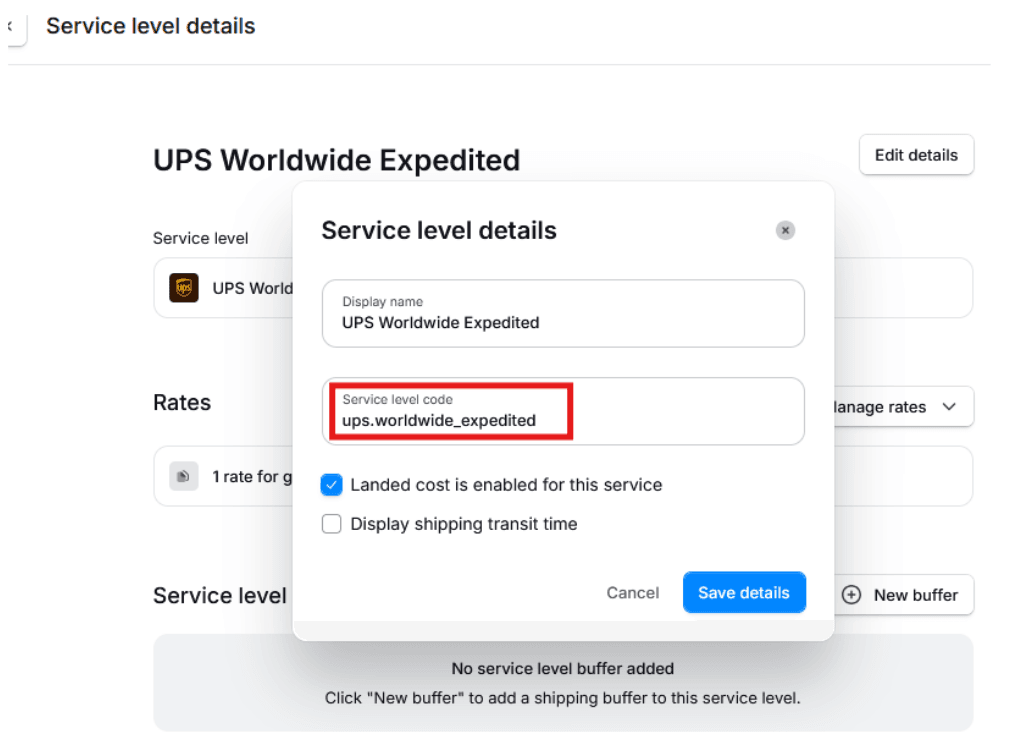
With the shipping service level code, create a mapping record mapping it to the SFCC shipping method you want to appear on your SFCC orders when that shipping service level (Zonos shipping method) is chosen in the Zonos checkout.
Once you've added a record for each enabled shipping service level code, as well as a default shipping method mapping, your Zonos Ship Method Mapping JSON object should look similar to this:
{
  "ups.worldwide_saver": "004",
  "ups.standard": "002",
  "ups.worldwide_expedited": "012",
  "ups.worldwide_express": "012",
  "default": "001"
}
Note: Because this is only a mapping of Zonos shipping methods to SFCC shipping methods, it's only important to have all the Zonos shipping methods included in the mapping. There is no need to have each of your SFCC shipping methods included in the mapping.
Configure the jobs
Included in the installation are two SFCC jobs to support the Zonos integration:
CreateOrdersFromZonos
This job looks for newly created Zonos order references in the zonosOrders custom object store, fetches full order details from Zonos, and creates corresponding orders in SFCC.
Schedule: You can schedule this job to accommodate your business needs, but typically, this job should be configured to run on an interval basis, relatively frequently (i.e. every 5-10 minutes), and each day of the week.
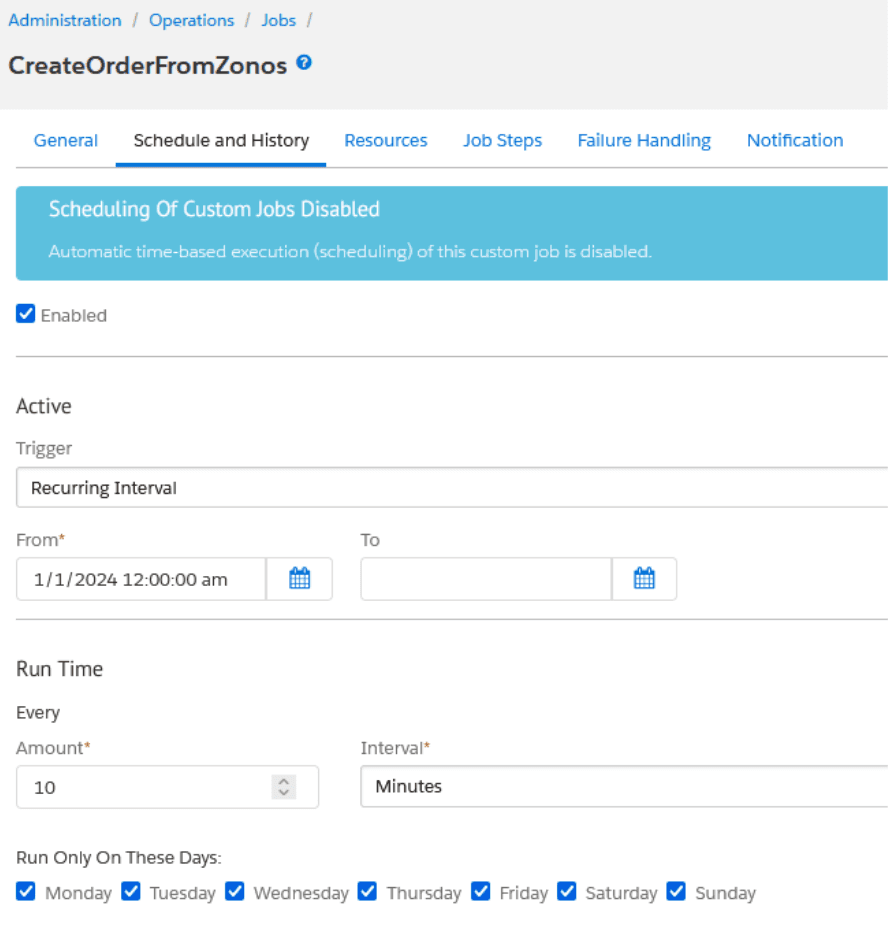
Custom Parameters: The CreateOrdersFromZonos job does not include any custom parameters.
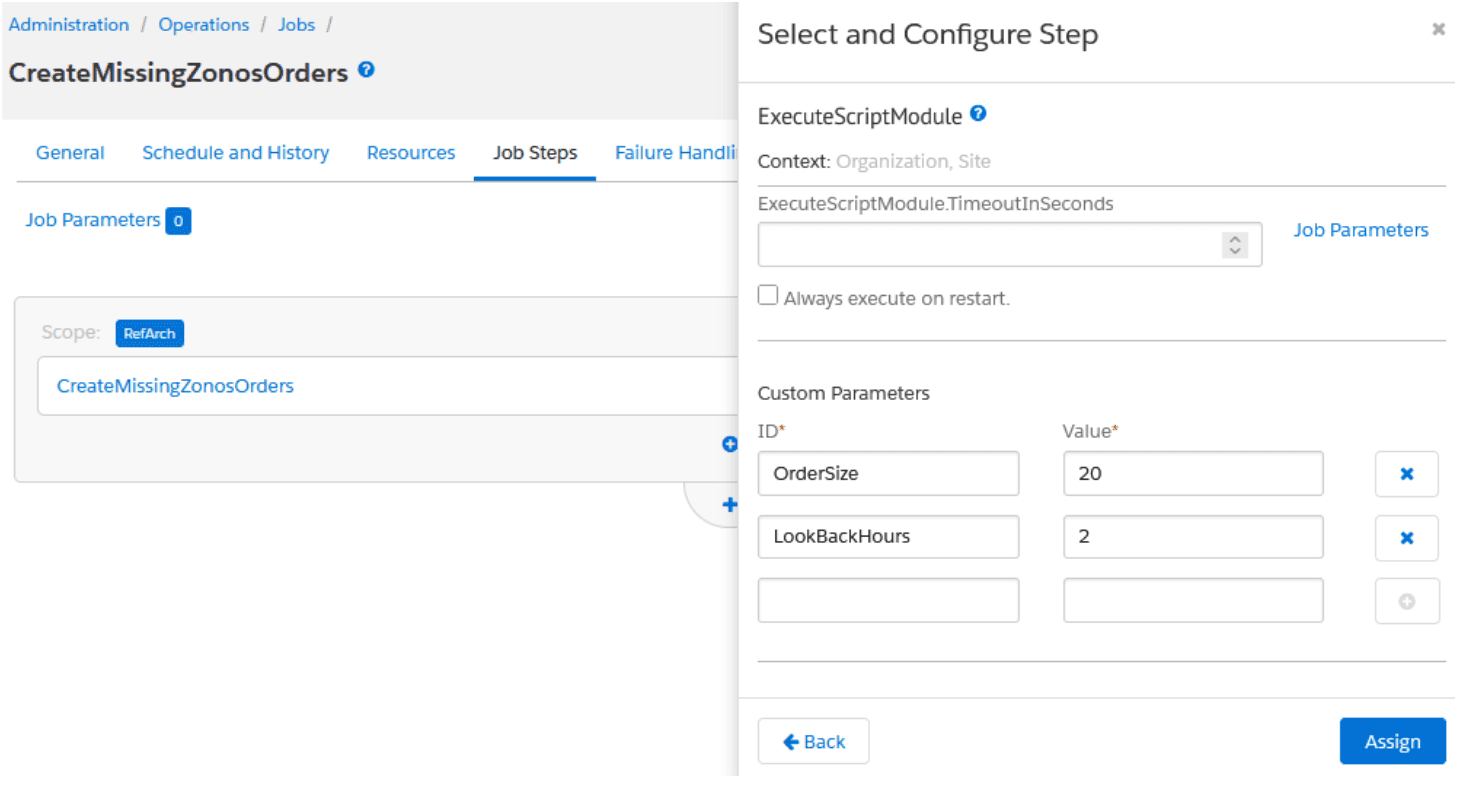
CreateMissingZonosOrders
While it should be rare, it's possible that, because of unforeseen circumstance(s), there may be orders placed in Zonos that don't make it into your SFCC instance via the normal process. For this reason, we have included the CreateMissingZonosOrders job. This job performs a cross-check between your Zonos order history and SFCC to identify and import any missing orders.
Schedule: You can schedule this job to accommodate your business needs, but you should schedule this job to run less frequently than the CreateOrdersFromZonos job. Some things to consider when scheduling the frequency for this job to run:
- As is the case with all jobs, after all things are considered—including processing load/bandwidth and your business needs—you should schedule this job to run as infrequently as you feel you can.
- Since this job will query all orders over a time period, high-volume sites should run this job more frequently (so less orders processed per job run), where as lower volume sites can get away with less frequency.
- Our baseline suggested frequency for the
CreateMissingZonosOrders, that we think will work for most sites, is once every 90 minutes.
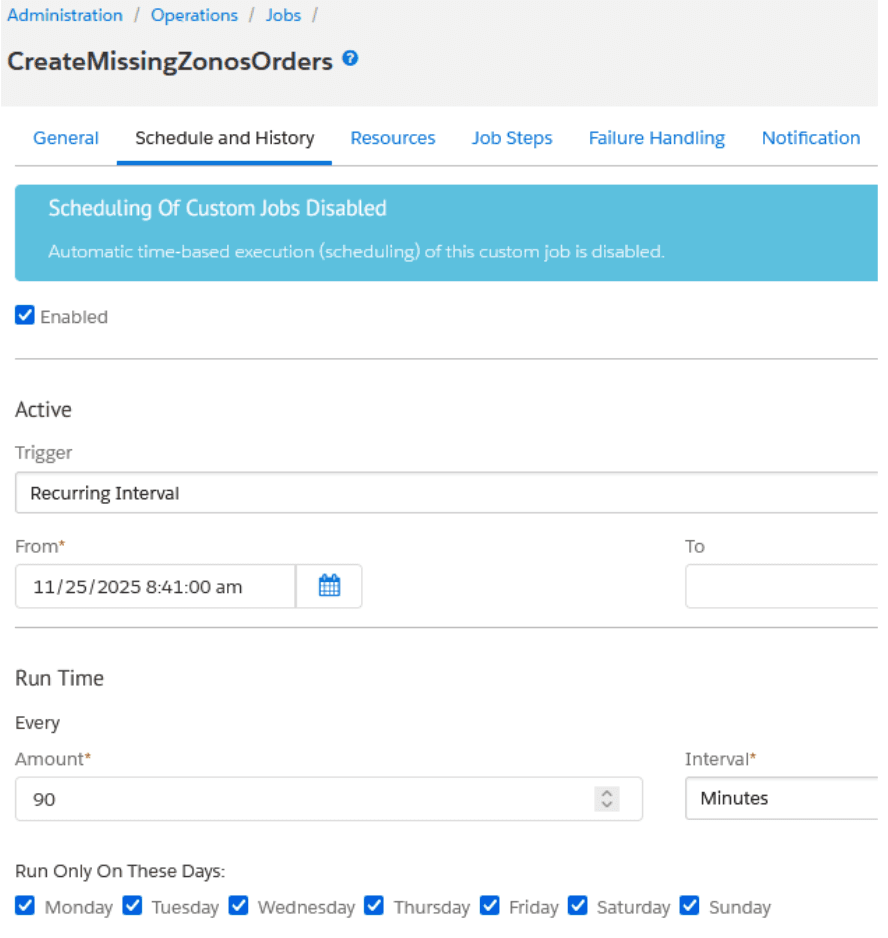
Custom Parameters: There are two custom parameters associated with the CreateMissingZonosOrders job step that you should set:
- LookBackHours: This is the number of hours (from the time that the job runs) back in time for which the job should query Zonos looking for missing orders. Based on your scheduled frequency for the job, this value should be at least equal to the time between job runs, and ideally should have an overlap. For instance, if the job is scheduled to run every 90 minutes, set
LookBackHoursto2(hours). Default value (if no value is set):2 - OrderSize: Maximum number of orders to retrieve per internal query of Zonos. Think of this as the page size the job uses when querying Zonos for orders. Default value (if no value is set):
20
Configure Zonos Hello
Zonos Hello provides client-side localization capabilities such as dynamic language selection, duty/tax messaging, and inline currency conversion. Once Zonos is enabled in site preferences, Hello loads automatically on your storefront via the Zonos client script.
The Zonos client scripts are added using an SFCC remote include of the Zonos-ClientScriptInclude endpoint, located at the bottom of the following overlay templates:
/cartridge/templates/default/common/layout/page.isml/cartridge/templates/default/common/layout/checkout.isml
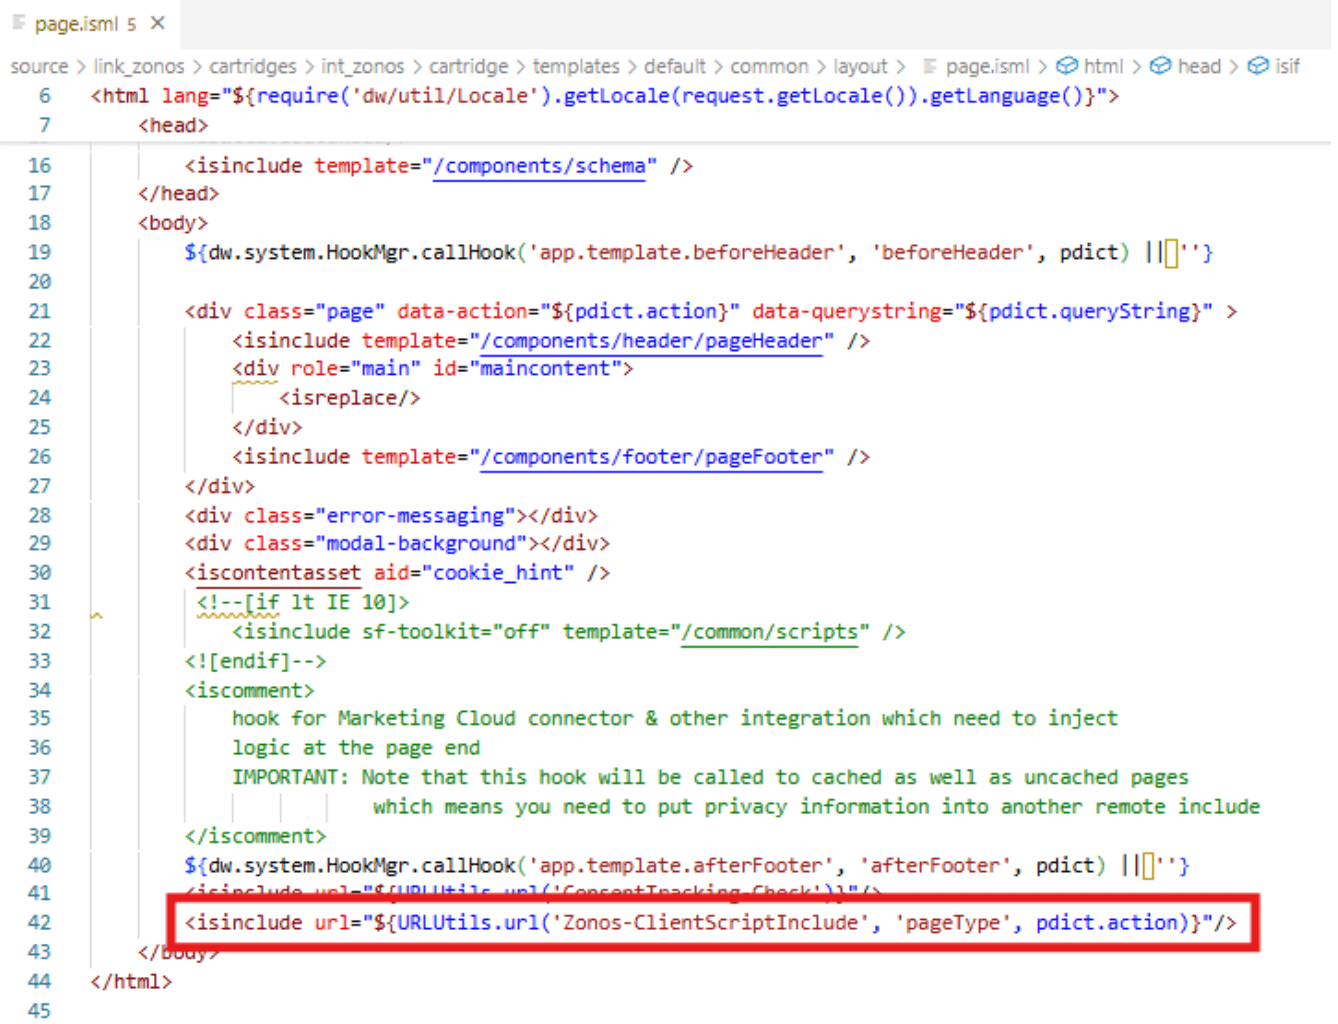
If your project overrides these templates in higher-priority cartridges, ensure the remote include is added to your customized versions:
<isinclude url="${URLUtils.url('Zonos-ClientScriptInclude', 'pageType', pdict.action)}"/>
Learn more about Zonos Hello.
Configure currency conversion
Zonos Hello automatically converts price values displayed on the storefront into the shopper's local currency. For this to work correctly:
- Price values must be wrapped in HTML elements using class names or IDs that can be selected via jQuery. For example:
<p class="text-right sub-total zonos-price">${pdict.totals.subTotal}</p> - These selector values must be included in the Currency Element Selector site preference (or in your Zonos Dashboard).
Price display code changes
The Zonos cartridge includes the following overlay templates for where prices are rendered throughout the reference architecture site, utilizing class names zonos-list-price, zonos-sales-price, and zonos-price assigned to the HTML elements containing those various prices:
/cartridge/templates/default/cart/productCard/cartCouponDisplay.isml/cartridge/templates/default/cart/cartTotals.isml/cartridge/templates/default/checkout/billing/billingSummary.isml/cartridge/templates/default/checkout/cart/miniCart.isml/cartridge/templates/default/chackout/productCard/productCardProductTotalPrice.isml/cartridge/templates/default/product/components/pricing.isml/cartridge/templates/default/product/components/setPrice.isml
If there are no cartridges containing these templates and configured higher than int_zonos in the cartridge path, no code changes are necessary for Zonos Hello to convert the currencies of these price renderings on your site. If you have customized versions of these templates in one or more cartridges higher than int_zonos in the cartridge path, you'll have to include a unique class name to the HTML wrappers around your prices (as illustrated above) in those customized templates.
Configuring the price elements selector string
The currency selector string is a jQuery-style selector string value used by the Zonos script to identify HTML elements containing price values that should receive currency conversion updates. This value should be a space-delimited list of the CSS class names and/or IDs assigned to the HTML elements wrapping your site's price displays described in the previous step, where class names are prefixed with . and IDs are prefixed with # (without the quotes). For example, if your site will utilize the templates for price display included in the Zonos cartridge, the selector string will be .zonos-list-price .zonos-sales-price .zonos-price (without the quotes).
The currency selector string can be configured either via your Zonos Dashboard, or in the Currency Element Selector site preference of your Zonos custom site preferences in Business Manager.
Note: If configured in both places, the value in Business Manager will take precedence.
Learn more about Zonos Hello currency conversion.
Configure checkout button
The checkout button selector string is a jQuery selector string value used by the Zonos script to identify HTML elements on your site which serve as button controls where which when clicked, take the customer into your site's checkout flow.
When shoppers click a Checkout button that was matched by your configured selector string, Zonos automatically intercepts the action and opens the modal checkout.
The checkout button selector string can be configured either via your Zonos Dashboard, or in the Place Order (Checkout) Button Selector site preference of your Zonos custom site preferences in Business Manager.
Understand order confirmation and custom objects
When the user completes an order within the Zonos hosted checkout, they are redirected to a custom Pipeline that displays an order confirmation within SFCC (Zonos-OrderConfirmation). The primary rendering template for this order confirmation is /int_zonos/cartridge/templates/default/checkout/confirmation/zonosConfirmation.isml.
This order confirmation page uses the same styling as the native SFCC/SFRA order confirmation page and shares some .isml files with the native SFCC/SFRA order confirmation page. This may need some styling updates to match any custom style updates already made to the site. Base rendering templates utilized by the Zonos order confirmation template include:
app_storefront_base\cartridge\templates\default\checkout\confirmation\confirmationDetails.ismlapp_storefront_base\cartridge\templates\default\checkout\shipping\shippingSummary.ismlint_zonos\cartridge\templates\default\checkout\billing\billingSummary.ismlapp_storefront_base\cartridge\templates\default\checkout\orderProductSummary.ismlapp_storefront_base\cartridge\templates\default\checkout\orderTotalSummary.isml
The underlying function related to this custom pipeline outside of displaying an order confirmation to the user is related to a new custom object type that is included within the data import, zonosOrders. When the order confirmation displays for the user, SFCC is using the Zonos order id displayed in the url for the order confirmation and creating a corresponding custom object with the Zonos order ID as the Key Attribute for the custom object. This is then used to place the order within SFCC via job CreateOrdersFromZonos. This job will iterate through all custom objects of type zonosOrders with createdStatus = - None -. The job will perform a few tasks:
- Query Zonos for order details.
- Use this response to create the order within SFCC based on settings configured within site prefs for ship method and payment method + details for items, shipping, billing and customer within the response.
- Update Zonos with the SFCC order number via a mutation to associate this with the Zonos order number within the Zonos Dashboard.
If the above steps are successful, the custom object attribute createdStatus will be then set to created to remove the object from future consideration. If the above steps are not successful, the custom object attribute createdStatus will be then set to failed and an error message will be noted within the object in attribute errorResponse (Zonos) or sfccErrorResponse (SFCC) depending on the system responding with the error during the process.
If you need to re-try to place the order, just re-set the createdStatus to - None - and this will be taken into consideration in the next job run.
Adjust advanced settings
Optional—The following settings are advanced settings. Defaults are in place, so no action is needed. If you would like to make adjustments, follow these guidelines:
Create invoice on import
Set to Yes by default. Zonos will create an invoice upon the order import. If you choose to disable this feature, you will need to create your own invoice, and Zonos will set a fraud review hold to a zonos_hold status. Once the fraud is lifted, we will revert to the previous status.
Customer login
Set to No by default. If you want to require an account for checkout, switch to Yes. You will also need to go to Customer configuration > Login options and update Redirect Customer to Account Dashboard after Logging In to No.
SFCC order export
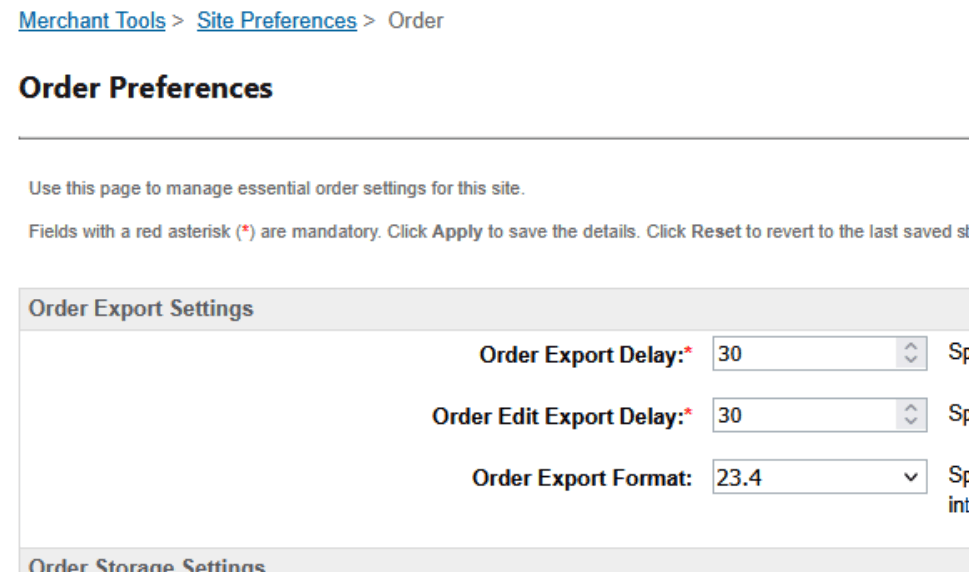
If you use, or are planning to use, the SFCC Order Export, ensure the Zonos custom attributes assigned to the Order and Product objects are included in your SFCC order export files. From Merchant Tools > Site Preferences > Orders, set the order export schema version to the latest version.
Test your integration
Now that you have set up your account and your app, you are ready to test your integration. You will need to enable Checkout and Hello in SFCC while testing. To do so:
- Go to Merchant Tools > Site Preferences > Custom Preferences > zonos.
- Switch Zonos Enabled to Yes.
Once you have your Zonos account information configured in your site's custom site preferences, and the Zonos Enabled feature switch set to YES, you can test Zonos features on your storefront by adding the following parameter to your site's URL: zCountry=[country code of a country you have enabled in your Zonos Dashboard]
For instance, if you have Canada enabled: https://abcd-001.dx.commercecloud.salesforce.com/on/demandware.store/Sites-RefArch-Site?zCountry=CA
Note: This is only necessary for testing in non-production environments, where your Zonos Public API Token is configured with a test credential token. When configured with your live/production API token, the
zCountryURL parameter is not necessary or expected.
If you are not ready to be live yet, remember to switch Zonos Enabled back to No once you are done testing. After completing testing, enable Zonos using the same steps above.
Tracking number sync
Tracking numbers added in SFCC sync to Zonos automatically. However, tracking numbers added in Zonos Dashboard do not sync back to SFCC. If you add or update tracking numbers in Zonos Dashboard, you will need to manually update them in SFCC Business Manager as well.
Learn more about which integrations support tracking number sync.
Uninstall Checkout
Uninstalling the cartridge must be performed by an experienced SFCC developer. Contact your SFCC development team or Zonos support for assistance with uninstallation.
What product information should I provide for the most accurate quote on duties, taxes, and shipping costs?
Product information can impact the amount of duties and taxes due and the shipping cost. The more product information you provide to Zonos, the more precise the quote returned will be. Zonos can generate a quote even when this information is unavailable, but recommends providing the following key product details to improve accuracy:
- Weight: Weight impacts your shipping cost, which can affect duties or taxes. Weights in your SFCC product listings are automatically used by Zonos when present.
- Dimensions: Dimensions may impact your shipping cost, which can affect duties or taxes. Zonos can utilize product dimensions (length, width, and height) set on each product in SFCC, but you must map it in the Zonos custom site preferences for proper integration.
- HS codes: HS codes impact duty rates and can sometimes affect taxes. Zonos can use the HS codes set in your product listings in SFCC, but you must map the HS code field in the Zonos custom site preferences.
- Country of origin: A product's country of origin impacts duty rates and may affect taxes. The country of origin set in your SFCC product listings is automatically used by Zonos when present.
Note: Alternatively, you can enter the info into Catalog, overriding the information stored and passed from SFCC.
Learn more about product info by platform.
Checkout for Salesforce Commerce Cloud
Transform your SFCC store for global commerce with Zonos Checkout.
Zonos Checkout integrates directly into your Salesforce Commerce Cloud (SFCC) storefront, enabling seamless international transactions with built-in landed cost calculations, localized payment options, and automated order management between Zonos and SFCC Business Manager.
For your customers: Localized checkout in their language and currency with upfront landed cost calculations, fraud protection, and no surprise fees at delivery.
For your team: Seamless international calculations, order management in SFCC Business Manager with automatic order sync, and secure payment processing handled entirely by Zonos.