1. Create an account
-
Create an account using the Canada Post referral link.
- It's important to use the link from your post so that your account is linked to them.
- Do not use this link if you are not shipping with Canada Post.
-
You can sign up using one of these options:
- Google – Sign up with your Google account.
- Microsoft – Use your Microsoft account to get started.
- Manual sign up – Enter your details:
- Name
- Phone (optional)
- Password
- Accept the Terms of Service
-
Once complete, click Continue.
2. Verify your email and phone number
To keep your account secure, we’ll send a verification code to your email inbox.
- Enter the code in the verification field.
- Didn’t get it? Click Resend to request another code.
If you entered your phone number, you’ll also be asked to verify your phone number after you verify your email.
- Enter the code from your phone in the verification field.
- Didn’t get it? Click Resend to request another code.
3. Add your business information
-
Tell us a bit about your business so we can set things up correctly:
- Business name – The name of your company.
- Website URL – Your store or company website.
- Country – Where your business is based.
- Integration type – Choose the integration method that fits your setup.
-
Click Continue to Dashboard Lite when finished.
4. Set up billing
Reminder: Access to the Zonos Dashboard and its tools is free—no subscription fees. You'll only be charged for duties (remitted to CBP by Zonos on your behalf) and the postal clearance/processing fee.
To continue shipping via Canada Post to the U.S., the new tariff changes require payment of duties before the shipments leave Canada. Canada Post has partnered with Zonos, a Qualified Party approved by U.S. Customs and Border Protection (CBP), to collect and remit those duties to CBP.
In order for you to print Canada Post labels, you must have an approved billing method on file to become verified by Canada Post and Zonos.
As soon as you complete your business information and create your account, you’ll be prompted to enter your billing information. If you close out and need to return later, navigate to Zonos Dashboard → Settings → Billing to finish the setup.
To activate your Verified Account, complete these steps:
- On the Dashboard homepage, select Add billing details.
- Enter your credit card details under Add a payment method.
- Add your name, email, phone, and address under Billing details.
- Click Save to confirm your billing information.
- After you click Save, your account key should populate in the box labeled ACCOUNT KEY.
Upon completing this step, you now have a Zonos Verified Account.
You must keep a valid payment method on file so Zonos can invoice you directly for duties. If the credit card is not valid and duty collection fails, you will not be able to create Canada Post labels.
5. Connect your Account Key
These steps can vary depending on which system you use to print Canada Post labels, but the goal is the same: connect your Zonos Verified Account to the system you use to print Canada Post labels.
Once you have added a payment method and your account is approved, you'll receive a Zonos Account Key that you will need to add to your Canada Post Account Preferences.
See the screenshots below the following steps for more guidance.
To locate your Zonos account key and connect it to Canada Post:
- In the Zonos Dashboard, go to Settings → Integrations.
- Copy the token listed next to Account key. This code allows you to connect your Zonos account to Snap Ship/Shipping Manager.
- Log in to your Canada Post online Snap Ship/Shipping Manager account.
- In the navigation, go to Shipping → Shipping Tool and select Account preferences.
- Paste or enter your Zonos Account Key in your preferred Canada Post shipping tool under the automatic billing option with Zonos and click Save.
Now, anytime you print a label for a shipment under $800 USD going to the U.S., you can select Automatic billing (Zonos account key) under Method of U.S. duties payment when filling out your shipment details. This will ensure that Canada Post knows duties are covered, so they can issue your label. Zonos will bill you for the associated duties once we receive the shipment data from the post.
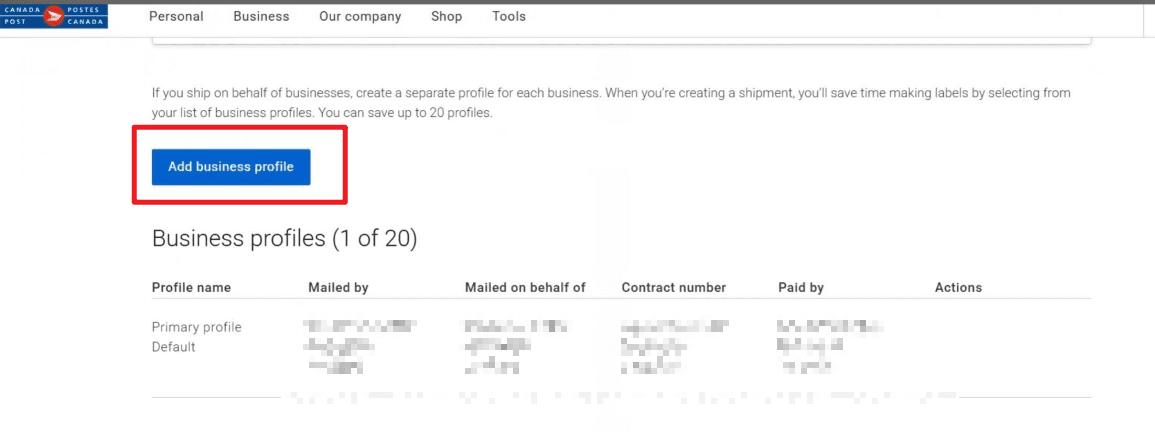
If you see an "account key invalid" error when adding your Zonos Account Key in Canada Post’s system, it may be because you don’t have a business profile set up.
To resolve this:
- Scroll further down the same Canada Post account settings page.
- Click Add business profile.
- Complete the setup steps, then re-enter your Zonos Account Key.
Step by step
This is the first page you see when logging in to Zonos Dashboard. Click Settings.
After you click into Settings, click Integrations and you will see your account key (example is highlighted in yellow).
The following images show the flow in Shipping Manager (follow the red circled areas).


Account setup
Follow these steps to set up a Verified Account so that you can continue shipping to the U.S. with Canada Post.